|
|
|
osvaldo rima
{K:6862} 7/30/2005
|
Perfect work & very good works in your portfolio.
Molto bravo!
Ciao
Os
|
|
|
|
 Dushan B. Hadnadjev
{K:366} 6/11/2005
Dushan B. Hadnadjev
{K:366} 6/11/2005
|
Perfect work!!
d.
|
|
|
|
|
Marco Arzilli
{K:931} 5/26/2005
|
Wow, excellent!
Congrats.
marco.
|
|
|
|
 Rosario Esposito
{K:9796} 5/21/2005
Rosario Esposito
{K:9796} 5/21/2005
|
Grande profondità,ottima luce.Complimenti
-Rosario-
|
|
|
|
|
altur .
{K:6087} 4/21/2005
|
Nice composition with great lightning and angle.
Thanks also for the explanation of your work in PS... nice of you to share it with us.
Great work.
Best regards, Alex
|
|
|
|
Mary Brown
 {K:71879} 4/14/2005
|
It is an intriguing picture. Makes on want to walk right into the light.
Mary
-
|
|
|
|
 Fadel J
{K:13974} 4/14/2005
Fadel J
{K:13974} 4/14/2005
|
Who else would get such results! fabulous work Carsten, as usual!
|
|
|
|
|
Carsten Ranke
{K:14476} 4/13/2005
|
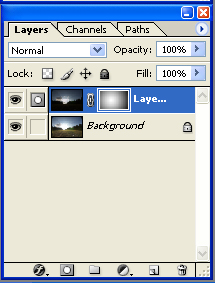
When satisfied, Layer > Flatten image (or Merge Down, in case of several layers, for selective application of a mask).
Regards; Carsten
|
|
|
|
|
Carsten Ranke
{K:14476} 4/13/2005
|
The same procedure, select all, copy, paste this shot as new layer, and create a mask (hide all). Painting with the (white) brush in the sun area unmasks this area. An alternative is a white radial gradient on the black mask, created with the gradient tool (chose a radial gradient in the options bar on the top): click-draw from the sun area to a corner (opacity for the gradient tool 100%). The effect of the unmasking on the ground is distracting, you can delete the whites in this region on the mask with a black brush, 100% opacity.
|

|
|
|
|
|
Carsten Ranke
{K:14476} 4/13/2005
|
In the Tools palette, chose white as foreground color. Then click on the gradient tool, and click-draw from top to bottom on the image: the image on top appears again, gradually, like a grad filter effect (opacity for the gradient tool 100%). You can repeat the action, starting a bit away from the upper border, and end the draw shortly after you reach the horizon. Fine-tuning is possible with the brush tool, white color. And you can correct your actions with black color, also with the brush tool, for example. So, you could erase all white from the mask in the lower part of the image, for better shadows, by painting with black on the mask there. Mask editing is possible only, if the Layer mask thumbnail is activated, so you should click on the mask thumbnail before you want to start mask editing.
If satisfied, click ?Layer > merge down?. Now you can get more detail in the sun area with another, more underexposed TIF from the RAW shot.
|

|
|
|
|
|
Carsten Ranke
{K:14476} 4/13/2005
|
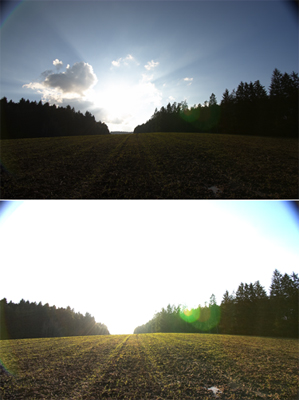
Open the both TIFFs in PS. In the highlights TIF, click ?select > all?, then ?edit > copy?. Chose the other opened TIF in PS, click ?edit >paste?. Now, the shadow TIF is covered and hidden by the highlights TIF.
If not open, show the Layers toolbox: Window > Layers (or F7)
Then, Alt-click on the ?Add mask? Icon. Now, the underlying shoadow TIF is masked, and you see a black mask on the Layer thumbnail.
|

|
|
|
|
|
Carsten Ranke
{K:14476} 4/13/2005
|
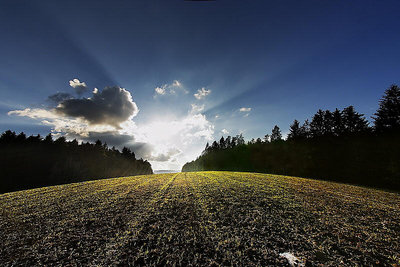
Peter, thank you for your comment. Because you ask for a description of my technique for blending multiple exposures, I will take this picture as an example (I am no PS expert at all, but after a long learning curve I grasped the PS layers function, at last).
A prerequisite is a RAW shot, exposed for the highlights. You can save underexposed pictures, but details in burnt-out areas are probably lost, at last partially. So, the best way is exposure bracketing, when you have a scenery with wide dynamic range. Shoot three RAW`s, the first exposed for the highlight, the other + 1 and + 2 EV, for example. If handheld, you have to align the bracketed shots in PS afterwards, if shot with a tripod, it is easy, you can skip the align process. This picture was from a single RAW shot, thus the shadow tones look a bit stressed. But for demonstration purposes this is ok.
So, you have a RAW shot of the scenery, with burnt out whites and underexposed shadows, at the beginning. With your RAW conversion sw you have to make different TIFFs, some for the highlights, and one or two for the shadows. In my DRebel edition of CaptureOne, it is quite handy to convert to variably under- and overexposed TIFFs. I`m not familiar with the Nikon sw, but I think you can do the same with your converter. BTW, I would recommend 16 bit/channel TIF if your converter supports it and you use PS CS.
|

|
|
|
|
|
Carsten Ranke
{K:14476} 4/13/2005
|
Peter, thank you for your comment. Because you ask for a description of my technique for blending multiple exposures, I will take this picture as an example (I am no PS expert at all, but after a long learning curve I grasped the PS layers function, at last).
A prerequisite is a RAW shot, exposed for the highlights. You can save underexposed pictures, but details in burnt-out areas are probably lost, at last partially. So, the best way is exposure bracketing, when you have a scenery with wide dynamic range. Shoot three RAW`s, the first exposed for the highlight, the other + 1 and + 2 EV, for example. If handheld, you have to align the bracketed shots in PS afterwards, if shot with a tripod, it is easy, you can skip the align process. This picture was from a single RAW shot, thus the shadow tones look a bit stressed. But for demonstration purposes this is ok.
So, you have a RAW shot of the scenery, with burnt out whites and underexposed shadows, at the beginning. With your RAW conversion sw you have to make different TIFFs, some for the highlights, and one or two for the shadows. In my DRebel edition of CaptureOne, it is quite handy to convert to variably under- and overexposed TIFFs. I`m not familiar with the Nikon sw, but I think you can do the same with your converter. BTW, I would recommend 16 bit/channel TIF if your converter supports it and you use PS CS.
(cont.)
|
|
|
|
|
|
Peter Godden
{K:745} 4/13/2005
|
Really interesting, it feels like some sort of gateway to somewhere. Beautiful effect in really difficult conditions.
Best Regards
Peter
|
|
|
|
 Keith Saint
{K:13784} 4/13/2005
Keith Saint
{K:13784} 4/13/2005
|
Great compositin and depth of field Carsten
Stunning shot
|
|
|
|
|
Peter Bowers
{K:181} 4/11/2005
|
another great shot Carsten
could you give a detailed tutorial on how to blend multiple exposures ?
|
|
|
|
|
Dirck DuFlon
{K:35779} 4/11/2005
|
This is gorgeous, Carsten! Everything in the composition leads the eye directly to the sunburst, which even the trees have made way for!
I also like the way you've brought out the yellow/green of the grass shoots. Maybe clone out the bright object in the lower-right?
|
|
|
|
 Trish McCoy
{K:15897} 4/10/2005
Trish McCoy
{K:15897} 4/10/2005
|
I'm in awe here. this is spectacular. the view and the colors here. amazing work. I bow to you :) awesome shot.
|
|
|
|
|
David Wade
{K:2123} 4/10/2005
|
Great lines leading to the sun, I think your distortion emphasises them well. Also whatever tricks you've done with PS they've worked well, though I don't understand them.
David
|
|
|
|
|
Elisabeth D'Amico
{K:6674} 4/9/2005
|
Excellent work. It's very nice also that you describe very patiently your shot and the digital correction that you do. Tnak you for your cooperation and helping me to learn more and more.
Eli:-))
|
|
|
|
|
Chris Spracklen
{K:32552} 4/9/2005
|
I just wish I could get my head round your technique, Carsten, as you produce some fabulous pictures with such a wonderfully balanced exposure right across the frame.
This one is so dramatic ~ rich colours, high contrast, rays of sunshine ~ it has everything!
Excellent work, as ever, my friend!
Best regards, Chris
|
|
|
|
|
David Hofmann
{K:22223} 4/9/2005
|
awesome look, looks like high speed racing. The high contrast works very nice. I wouldn't miss the spot at the lower edge if it was gone :)
|
|
|
|
 Paul Lara
{K:88111} 4/9/2005
Paul Lara
{K:88111} 4/9/2005
|
Thanks for explaining this dramatically beautiful shot, Carsten! I knew CCD's didn't have the latitutde to capture such an incredible shot, and was pleased to see you cared enough about us to explain it. SWEET!
|
|
|
|
 Debarshi Duttagupta
{K:26815} 4/9/2005
Debarshi Duttagupta
{K:26815} 4/9/2005
|
Excellent shot and brilliant PS work.
|
|
|
|
|
Barry Wakelin
{K:7838} 4/9/2005
|
Nicely worked and fantastic image. I love the way the lead-in lines look like sunbeams.
|
|
|
|
|
Carsten Ranke
{K:14476} 4/9/2005
|
Lex, thanks for your detailed comment. The little white thing on the lower right is actually not a bag, but a blotch of snow - the ultimatively last snow here ;-)
|
|
|
|
 Hugo de Wolf
{K:185110} 4/9/2005
Hugo de Wolf
{K:185110} 4/9/2005
|
Hi Carsten, Awesome perspective and feeling of depth, the fisheye / extreme wide angle effect takes an otherwise ordinary scene completely out of its perspective. Also , the way the single vanishing point is emphasised by both the lines in the field as well as the rays of light is perfect. Great shot.
Cheers,
Hugo
|
|
|
|
|
L B.
{K:13965} 4/9/2005
|
Sounds like a lot of work, but the result is outstanding! I really like the sun over the hill, the lighter part of the photo. You can excually see the light beams. Really superb. The sky has also turnt out great with the polarizer, nice strong lines and again the light beams. Although i am still wondering if you shouldn't crop a little bit from the lower side of the picture (the white bag or someting, at the middle right?) But no hard feelings, overall a more than beautifull picture!! Compliments!
Greets, Lex
|
|
|
|
|
murat TASBASI
{K:1352} 4/9/2005
|
Superb Carsten
So good
Congrats
Murat Tasbasi
|
|
|
|
 Maria Conversano
{K:2666} 4/9/2005
Maria Conversano
{K:2666} 4/9/2005
|
I love so much the effect of the lent and the angle! Creat capture!
Maria
|
|


")


")
dscape")


")