|
|
 Miguel Torres
{K:3998} 9/7/2007
Miguel Torres
{K:3998} 9/7/2007
|
Hello Sam.
Ultimatly i am very interested in IR Photography, can i do a simulation in PS without having the IR Filter? If so, could you please explain me how.
If not, which filter do you recommend me to buy?, i own a Canon Digital Rebel XT.
Thanks for your help.
Regards,
Miguel Torres
|
|
|
|
Mary Brown
 {K:71879} 6/18/2007
|
This is so kind of you to take the time to load the step by step instructions. This took you a lot of time. Thank you very much for doing it. It is very informative.
MAry
|
|
|
|
 Sam Graziano III
{K:14064} 5/5/2007
Sam Graziano III
{K:14064} 5/5/2007
|
How would I do that?
Thanks for the compliment as well my friend.
Regards
Sam III
|
|
|
|
 Doyle D. Chastain
{K:101119} 5/5/2007
Doyle D. Chastain
{K:101119} 5/5/2007
|
Excellent!!! Consider posting this in the Forum??
Regards,
Doyle I <~~~~~
|
|
|
|
|
Robert Chin
{K:22282} 4/26/2007
|
Thanks Sam but that wasn`t for me,it was for other
Non-IR viewers.I uses a IR converted D70,also
the Dimage7 which I uses for B&W..AWESOME and cheap.IMHO Cocam IR filters are as good as they come.
Regards and keep posting your wonderful posting IR images.
Robbie
Our work flow varies in that I uses 'Color Balance
& Hue/Saturation plus I rarely sharpen,I love to soften my IR.
|
|
|
|
|
Sam Graziano III
{K:14064} 4/26/2007
|
Sure Robert,
Recipe= the following
Camera-lol
Tri-pod
Shutter Release
Lens- Now when it comes to the Lens you are going to use, make sure it is subject appropriate. Meaning Wide Angle for Landscapes and Telephoto for Close ups.
I used the EF-S 17-85mm Canon with a Hoya R72.
IR Filter( Now with IR Filters, they have a wide variety of IR Filters. I have found that Hoya Makes the best best IR filters on the market.
This filter is used for photography with infrared films. Infrared film is also sensitive to ultraviolet rays and the shorter wavelengths of the visible spectrum so it is necessary to filter out all but the infrared rays. Hoya makes two types of infrared filters: R72 passes only infrared rays above 720nm; RM90 passes only that above 900nm.
One of the most important things to remember when shooting IR is NOT to have your Aperture Set at anything higher then F5.6. Because if it is, you will get hot spots. Now if you have the IR blocking filter removed from your Camera then it doesn't matter. The reason why it matters with the inturnal IR Blocking filter still on the camera, is the shutter speed is dramatically increased.
I hope this helps you Robbie.
My Best Regards
And thank you for the comment.
Sam III
|
|
|
|
 Jason Mckeown
{K:22200} 4/26/2007
Jason Mckeown
{K:22200} 4/26/2007
|
Great Tutorial Sam well worth a look at next time i go out shooting
|
|
|
|
|
Robert Chin
{K:22282} 4/26/2007
|
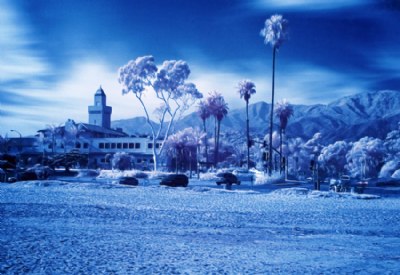
Awesome tutorial Sam!!!
Wonderful image with a excellent tones and well composed.
7++++
Take care
Robbie
It would be great if you give a camera setup for Canon 20D and the compatable IR lenses since not all lenses are good for IR.
Thanks for generating interest in IR.
|
|
|
|
 Annemette Rosenborg Eriksen
{K:55244} 4/25/2007
Annemette Rosenborg Eriksen
{K:55244} 4/25/2007
|
Dear Sam
I´m impressed about your willingness to share this IR-tutorial taking the time to help me and other interested photographers. Thank you so much!!
The photo is almost spacelike and could be used in a sci-fi:-) I love the IR-effect.
Take care
Annemette
|
|
|
|
 Sergio Cárdenas
{K:25028} 4/25/2007
Sergio Cárdenas
{K:25028} 4/25/2007
|
Great tutorial and work Sam! Thank you for sharing with us.
To my fav!
|
|
|
|
 Aniket Chakrabarty
{K:590} 4/24/2007
Aniket Chakrabarty
{K:590} 4/24/2007
|
Excellent awesome description..............
This is my BIP..............
It is beyond 7+++++++++++++++++++++++++++++++
Kudos...........
Regards,
Aniket
|
|
|
|
|
Frank Mercer
{K:1925} 4/24/2007
|
Great shot, and fantastic description!! Thanks very much for posting this. I have recently started shooting IR and this will help me out a lot. I use PS Elements and will try the same technique later this evening on one of my shots. Thanks again,
Frank
|
|
|
|
|
sascha jonack
{K:19715} 4/24/2007
|
Very cool effect. I like it a lot. Well done.
Sascha
|
|
|
|
|
Sam Graziano III
{K:14064} 4/24/2007
|
After You have done your work flow, You can go back and make any adjustments or dust spot removal that may be needed.
I know that this isn't a very indepth Tutorial, but I figured that most people will know how to work-flow there images. So I decided to just post the basics and the nessesary thing needed to be done to convert your image from IR to False Color IR.
I hope that this helps.
My Very Best Regards
Sam Graziano III
|
|
|
|
|
Sam Graziano III
{K:14064} 4/24/2007
|
The Next Thing I did was run a Smart Sharpen by Going to Filter, Down to Sharpen and over to smart sharpen. As the following screen shot will show.
|

screen shot 11 |
|
|
|
|
Sam Graziano III
{K:14064} 4/24/2007
|
The Next thing I do in my work flow process is to open a selective color adjustment layer.
|

screen shot 10 |
|
|
|
|
Sam Graziano III
{K:14064} 4/24/2007
|
Your Curves adjustment is your personal taste and image needs. I adjusted mine to the following a basic S curve adjustment.
|

screen shot 9 |
|
|
|
|
Sam Graziano III
{K:14064} 4/24/2007
|
After you have achieved the desired levels adjustment, merge it down to the duplicate layer and then use the curves adjustment in the Create a new fill or adjustment layer.
|

screen shot 8 |
|
|
|
|
Sam Graziano III
{K:14064} 4/24/2007
|
After you change the values of both the red and blue channel merge the Adjustment layer down with you duplicate layer and then, Again useing the fill or adjustment button at the bottom of your layer palette, select the level adjustment. as displayed.
|

screen shot 6 |
|
|
|
|
Sam Graziano III
{K:14064} 4/24/2007
|
After you change the red channel values you need to select the Blue channel and change the values of that channel to the following.
|

screen shot 5 |
|
|
|
|
Sam Graziano III
{K:14064} 4/24/2007
|
With the Channel Mixer open, In the Red channel change the values to the following.
|

screen shot 4 |
|
|
|
|
Sam Graziano III
{K:14064} 4/24/2007
|
Next thing I do is, Click the Add New fill or Adjustment layer and select the Channel Mixer.
|

screen shot 3 |
|
|
|
|
Sam Graziano III
{K:14064} 4/24/2007
|
Next thing is to duplicate your image, Do this by holding down the CTRL~J. Your PS Deaktop should look like this.
|

screen shot 2 |
|
|
|
|
Sam Graziano III
{K:14064} 4/24/2007
|
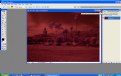
After you have opened the Raw image your PS Desktop will look like this
|
screen shot 1 |
|
|
|
|
Sam Graziano III
{K:14064} 4/24/2007
|
First thing you need to do is open the IR Photo you want to work on. When I open my shot, I UN-check all the boxes( as seen in this screen shot
|

screen shot 0 |
|